Ruby On Rails Intro
Made possible by:


On The Web: litmis.com
Follow on Twitter: @litmisteam
Connect via email: team@litmis.com
Short URL: bit.ly/litmislearn-rubyonrailsintro
Table Of Contents
Step 1: Litmis Space Configuration
Step 3: Generate Blog CRUD (Create, Read, Update, Delete)
Step 5: Unit testing? Who does unit testing?
Step 6: Another Feature, Search
Step 7: Another Feature, Comments on a Post
Step 8: Another Feature, Adding Paging By Adding A Gem
Step 9: HAML - Cleaning Up The View Syntax
Introduction
This is a lab to meant to give you exposure on how RubyOnRails works on the IBM i platform. Labs are conducted on "Litmis Spaces"; a service from KrengelTech to provide preconfigured open source environments on IBM i cloud instances.
-
In short, everything can be done through the browser - no need to install big IDEs on your desktop. Happy day!
Conventions
- When you see a $ sign that means you are at a shell prompt.
- When you see irb> that means you are in the rails console.
Step 1: Litmis Space Configuration
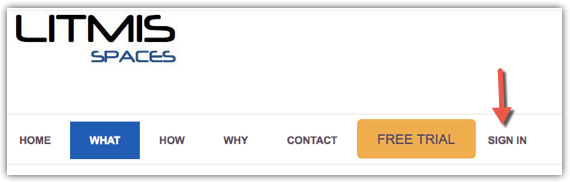
Go to https://spaces.litmis.com and select SIGN IN, as show below.
-
-
-
-
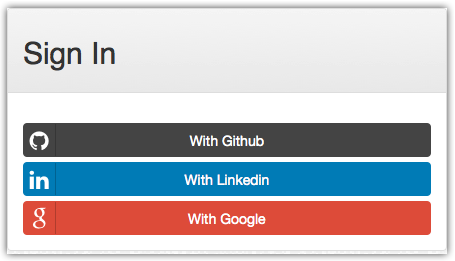
Select the authentication mechanism of your choice. If you don't have an account with the options listed, sign up for a free Github.com profile.
-
-
Create a New Space
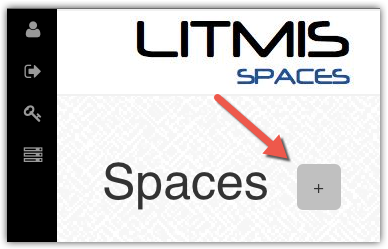
Once logged in you can create a new space, as shown below.
-
-
-
-
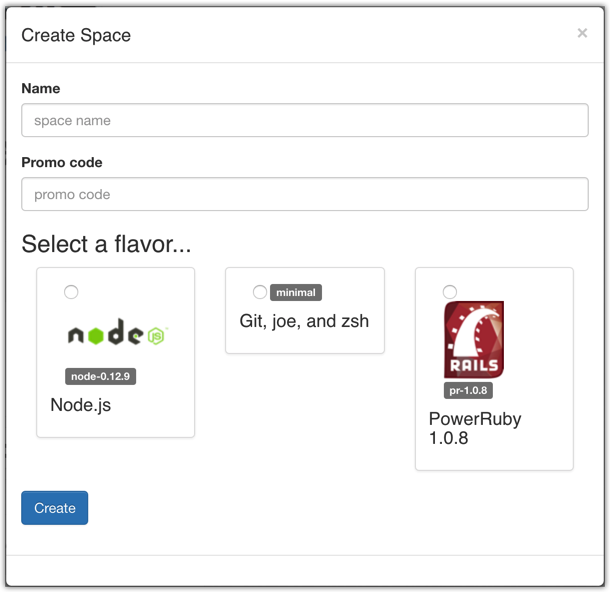
You will be presented with the pop-up below. Give a name to this space, enter the promo code of BETA, select the PowerRuby flavor radio button, and click the Create button.
**Email team@litmis.com with questions.
-
-
-
-
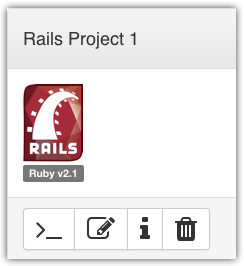
Now you should see a new box on your page that represents your newly created Space. This Space corresponds to your profile, as shown below.
-
-
-
-
There are four buttons which constitute actions you can take with your Space. They are (left to right):
- Shell prompt. You will use this to enter commands in the PASE environment on the IBM i. This is browser-based and doesn't require any software to be installed on your desktop.
- Editor. Where you will edit your source code and navigate the file system. This is browser-based and doesn't require any software to be installed on your desktop.
- Space Information. Here you will find information about your space such as user profile, database schemas (aka libraries), ports for your web app to listen, Space id, etc.
- Delete Space. WARNING! If you select this option and the subsequent warning prompt, your Space will be deleted. This CANNOT be undone.
Step 2: The Initial Rails App
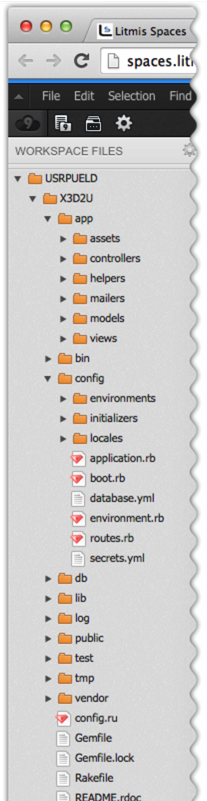
Below we see a screenshot of a typical Rails application folder structure. This is created with the rails new <app_name> command, again, done in advance for you because of additional IBM i setup. Below we describe what some of the folders are used for.
-
-
-
-
X3D2U - Root folder of Rails application. Whenever you issue commands for this application they will only work when inside this folder. NOTE: The Rails root folder name is dynamically generated and will be different for your environment.
-
app/controllers - Rails follows the MVC (Model View Controller)** approach to application. This folder contains the controller code.
-
app/models - This folder contains the model code. Typically you will have a file in this folder for each DB2 table you create/use within the application.
-
app/views - This folder contains the view code. When dealing with a web app the view code is HTML. In the case of Rails the view layer uses something called .erb files. ERB stands for HTML Embedded Ruby - basically a way to embed Ruby code inside an HTML document.
-
config/routes.rb - This file contains the routes for your Rails application. When a user makes a request from the browser (i.e. http://machine.com:port/posts) the Rails engine reviews the URL to determine what Controller program should be invoked.
-
app/db - This folder contains a variety of things and for the purposes of this tutorial it will mostly be used for database migrations. Migrations are a feature of Active Record that allows you to evolve your database schema over time. Rather than write schema modifications in pure SQL, migrations allow you to use an easy Ruby DSL to describe changes to your tables.
-
Gemfile - This is a file the stores the Ruby Gems that your Rails application depends on. Later you will add a Gem to this file, run bundle install, and the Gem will be downloaded from RubyGems.org and installed to your environment.
-
**MVC (Model View Controller) is a programming practice that keeps portions of an application separate from others. For example, one practice is to never put business logic in the View (HTML) layer of an application. To relate this to RPG think of the View layer as being similar to your *DSPF DDS code. The Controller layer is where your RPG EXFMT and main loop reside (i.e. the loop that checks what key the user pressed and routes the request to the appropriate sub routine). The Model layer is where business logic and database access resides. Think of this as being similar to how we store RPG business logic and DB access in separate *PGM or *SRVPGM objects.
-
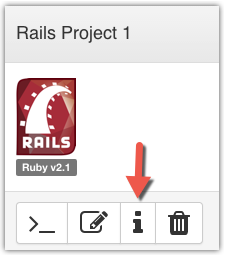
At this point the app doesn't yet do anything though it does have a "hello world" type page we can view by starting the Rails application server. Part of starting the Rails application server is specifying the port to listen on. The port of a particular Space can be found by clicking the information button, as shown below.
-
-
-
-
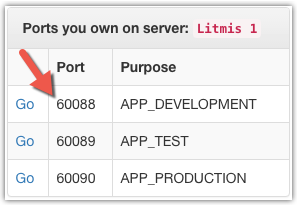
You will be presented with a pop-up that has a section declaring the ports designated to your IBM i profile (only you can use them). In this case the port used at development time is 60088. NOTE: Your ports will be different than those listed below.
-
-
Next open the shell console and use the pwd command to learn where we are at in the IBM i IFS directory structure, as shown below. In this case we are in the default directory. We need to cd (change directory) into X3D2U which should be the only directory in your home directory. NOTE: The user profile is dynamically generated (i.e. USRPUELD) and will be different for each Space.
-
-
$ pwd
/home/USRPUELD
$ ls
X3D2U
$ cd X3D2U
-
-
Next use the rails server -p60088 command to start the Rails application server, as shown below. Make sure to use your port.
-
-
$ rails server -p60088
=> Booting Puma
=> Rails 4.1.8 application starting in development on http://0.0.0.0:60088
=> Run `rails server -h` for more startup options
=> Notice: server is listening on all interfaces (0.0.0.0). Consider using 127.0.0.1 (--binding option)
=> Ctrl-C to shutdown server
Puma 2.11.1 starting...
* Min threads: 0, max threads: 16
* Environment: development
* Listening on tcp://0.0.0.0:60088
-
-
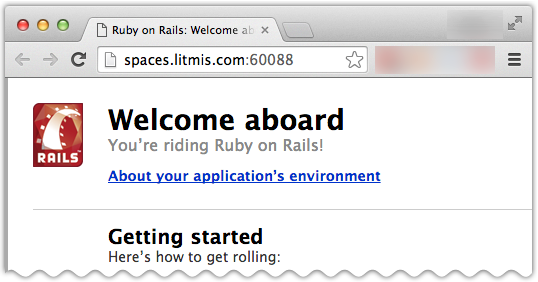
At this point your application is live on the internet. Open the browser to http://spaces.litmis.com:60088 and you should see the following.
-
-
-
-
To stop the server do a Ctrl+C in the shell browser tab.
-
-
List Current Tables
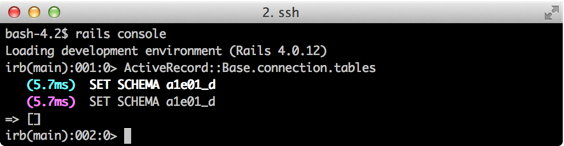
One tool you will find very useful while developing is the Rails Console. The rails console command will load up and initialize the current Rails web application so you can interact with it - for example, get a list of existing database tables as shown below. Note that Ruby is a case sensitive language. NOTE: The irb> below is the prompt for when you are in the Rails Console. Do not include that when you copy/paste the commands.
-
-
$ rails console
irb> ActiveRecord::Base.connection.tables
-
-
-
-
As expected there are currently no tables in our library. We can create new tables by pursuing our first feature of the application. Type quit to exit the Rails Console.
-
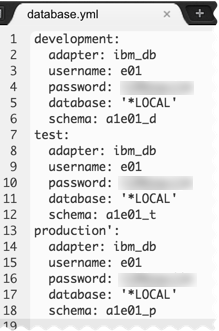
Side Note: You can see database connection information by opening file config/database.yml as shown below.
-
-
Step 3: Generate Blog CRUD (Create, Read, Update, Delete)
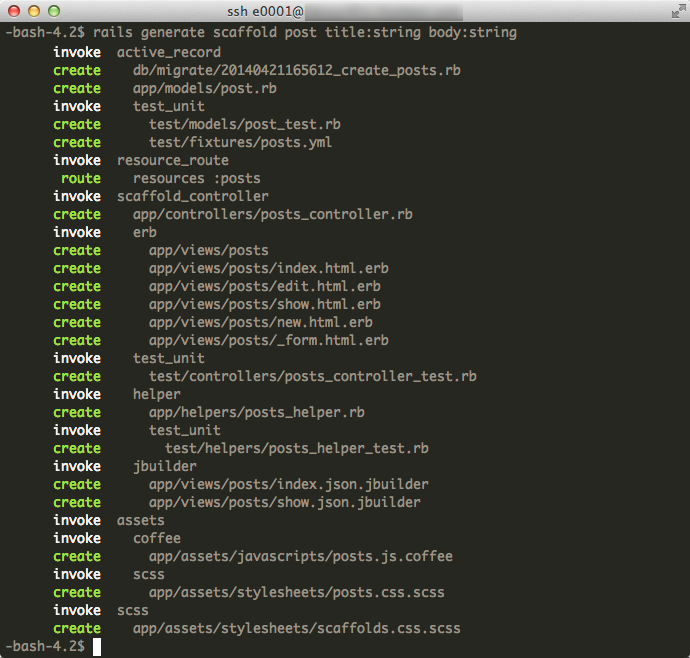
Next we will create a full scaffold (aka model, views, controller) for a blog application by issuing the following command from our app root directory. Every blog has posts so we will create scaffolding for a post and declare it has two DB2 columns - title and body (both strings).
-
-
$ rails generate scaffold post title:string body:string
-
-
Here are the results:
-
-
This accomplished a variety of things including generating an entire Create/Read/Update/Delete application for us to use from the browser.
-
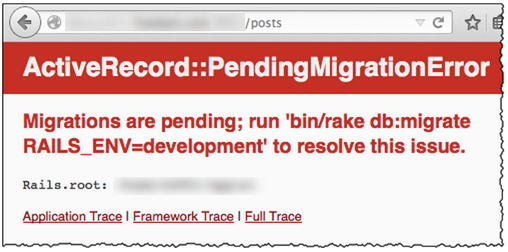
Go ahead and start the web server again with rails s -p<port> and then go to URL http://<machine>:<port>/posts and you should see the following error.
-
NOTE: Pressing the up arrow while in a shell session will circulate through previously run commands. This is helpful when frequently stopping and starting the Rails server during development.
-
-
-
-
This tells us that our database (aka IBM i library) doesn't match the database changes of what currently exists in the application. Before you can go on you need to exit out of the web server (Ctl+C) and run the below command.
-
-
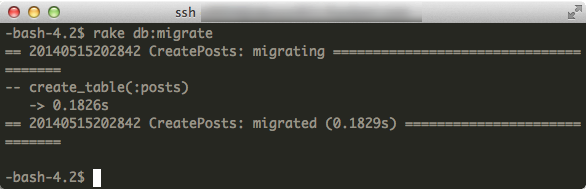
$ rake db:migrate
-
-
-
-
What just happened? Under the covers an SQL CREATE TABLE statement was generated and run against your IBM i library (aka schema or collection).
-
-
CREATE TABLE posts(
id int NOT NULL
GENERATED ALWAYS AS IDENTITY
(START WITH 1 INCREMENT BY 1),
title varchar(255),
text varchar(255),
PRIMARY KEY(id)
)
-
-
Wait. Didn't we call it "post" (singular) above? Yes, this is a Rails naming convention that you should be aware of where tables are created as plural by default. Note you can override this in the app/models/post.rb model using self.table_name = 'POSTPF' if it was an application requirement. If you think about it, it makes sense to have a plural name for the table because it is hold many posts. And then when you obtain a single row you have a singular post.
-
Migrations are a feature of Rails that allows you to evolve your database schema over time. Rather than write schema modifications in pure SQL, migrations allow you to use an easy Ruby DSL to describe changes to your tables. Learn More
-
The schema_migrations table has a single column that stores the last migration that took place against this database (aka IBM i library). When the rake db:migrate command is run it will first query the schema_migrations table and then compare it to the migration files that exist in folder db/migrations and run any that do not yet exist in that database.
-
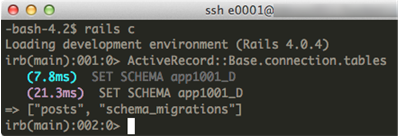
Now if we display the list of tables again we can see the posts and schema_migrations tables exist. First go into the rails console.
-
-
$ rails c
-
-
Now you are in the "rails console" and can enter additional commands. Run the below command starting with portion ActiveRecord...
-
-
irb> ActiveRecord::Base.connection.tables
-
-
-
-
Exit the Rails Console by typing quit and then start the server with the following command. Replace the <port> with your specific port.
-
-
$ rails server -p<port>
-
-
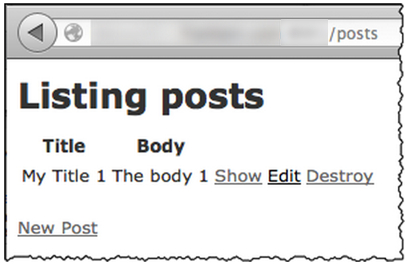
Then point your browser to URL http://<machine>:<port>/posts and you should see something similar to the following (note I added a single row to the database so you could see values in the columns). Go ahead and click the New Post link to create a new post.
-
-
-
-
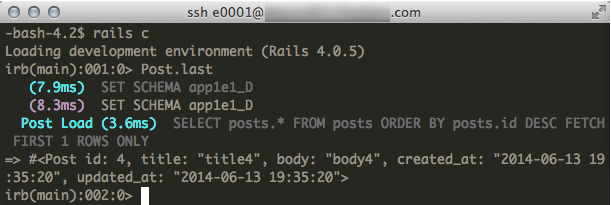
Start up rails console (rails c for short) and enter Post.last to display the last row in the POSTS DB2 table. The Post.last syntax is part of Rails' very extensive ActiveRecord syntax. Try Post.all to see a list of all rows. Try Post.find(1) to retrieve a specific row based on it's id column value - this is similar to an RPG chain.
-
-
Step 4: Validating Input
It's always necessary to validate user input to insure the minimal data requirements are met and Rails makes it very simple to add validations. Validations are often added at the model level, as shown below in file post.rb. This is good place to put them (vs the controller) because the model is the gatekeeper of the database table.
-
The validates_presence_of method can specify one or more of the model's attributes (aka columns). Here we are requiring the :title column.
-
-
---app/models/post.rb---
class Post < ActiveRecord::Base
validates_presence_of :title
end
-
-
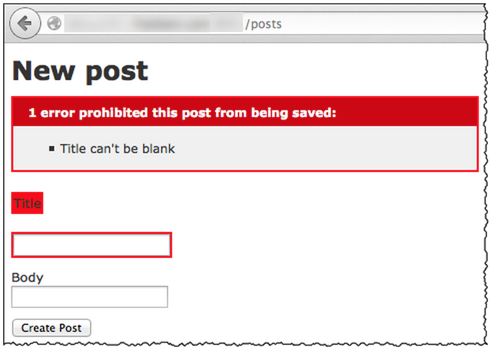
Now if you try to add a new post without a title it will result in an error being sent back to the screen. Does it get any simpler than that to add validation? No.
-
-
-
-
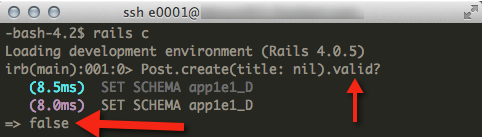
An even quicker way to test a change like this is to open the rails console and issue the like of code Post.create(title: nil).valid?, as shown below. I will often have a separate SSH session open that dedicated to running a rails console so I can quickly test my changes.
-
-
-
-
But who wants to manually test this newly created functionality before each deployment? That's where automated unit tests come in.
Step 5: Unit testing? Who does unit testing?
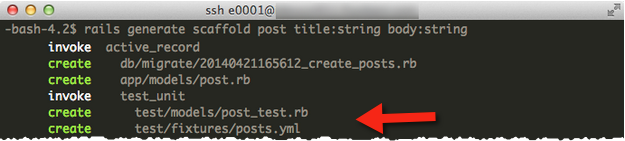
Rails does unit testing, and does it well. That's because unit testing was built into the framework from day 1 and is a natural part of how all of the code generators operate. Going back to the original creation of the scaffolding we can see the rails generate command created the post_test.rb and posts.yml files, as shown below.
-
-
-
-
The generated posts.yml file, shown below, uses the YAML (Yet Another Markup Language) syntax to hold sample test data. This is known as a "fixture" in the Rails world, and is a fancy word for, again, sample test data.
-
-
---test/fixtures/posts.yml---
one:
title: MyString
body: MyString
two:
title: MyString
body: MyString
-
-
Next we see the generated posts_test.rb file with commented out code. When the post scaffolding code was generated it didn't yet have anything to test (hence the commented out code), but now that we've added a validation we should add a corresponding unit test.
-
-
---test/models/posts_test.rb---
require 'test_helper'
class PostTest < ActiveSupport::TestCase
# test "the truth" do
# assert true
# end
end
-
-
Modify the posts_test.rb file to have the following test. You'd be in good company if you thought this looks a little like a COBOL programmers child gone wild - but there is purpose behind this verboseness. The test syntax is actually a method call with "should not save without title" as its only parameter. If the test fails it will include this text in the results for easy identification. The content between do and end is called a Ruby block which we will discuss more later. For now just know you should put your unit test in that Ruby block.
-
The posts(:no_title) is a convenience method used to load fixture data in simple fashion (notice the modified posts.yml file below that doesn't have a title value specified). In this case it will create a post object without a title and store it in the p variable. It will then attempt a p.save and have the result passed to the assert_not method, essentially asserting that the data was not saved to the database. In Ruby the last evaluated line of code's value is returned to the caller. In this case the assert_not will return either true or false. If false, then it will consider the test failed and report it.
-
-
---test/models/post_test.rb---
require 'test_helper'
class PostTest < ActiveSupport::TestCase
test "title required" do
p = posts(:no_title)
assert_not p.save
end
end
---test/fixtures/posts.yml---
no_title:
body: MyString
-
-
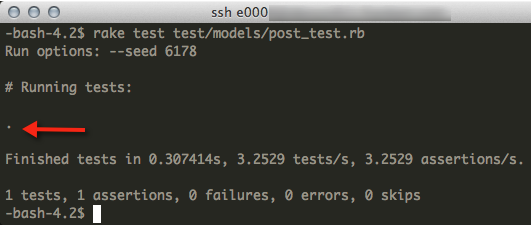
Running the Rails unit tests can be done for the whole application or a portion. To run all unit tests, issue command rake test from within the Rails application's root folder. Sometimes running all the tests can take a long time if you are just wanting to insure your most recent unit test is working. To run a specific test you issue the full path to the unit test, as shown below.
-
NOTE: You may get the following errors when running unit tests. This is an expected error when your profile doesn't have authority to commands ADDRPLYE and RMVRPLYE. Ignore the error.
-
-
Failed to execute statement due to: Trigger program or external routine detected an error. SQLCODE=-443
Failed to execute statement due to: <mylib>_T in *N type *LIB already exists. SQLCODE=-601
-
-
$ rake test test/models/post_test.rb
-
-
-
-
In the above test we can see the tests passed ok (i.e. 0 failures, 0 errors). The single dot being pointed at is declaring how many tests were run so you can get a quick visual of successes and failures.
-
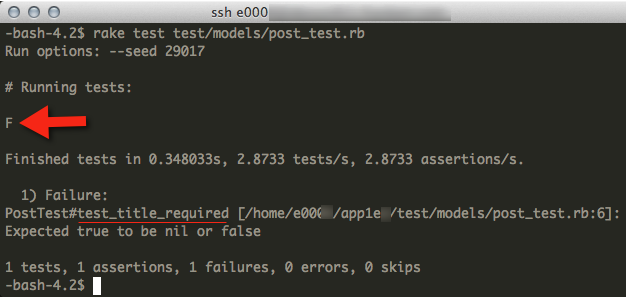
It's always good to see what a failure looks like so go ahead and put a # symbol in front of the line validating the presence of title, as shown below.
-
-
---app/models/post.rb---
class Post < ActiveRecord::Base
#validates_presence_of :title
end
-
-
Now run the test again and it will fail because the post was successfully saved without a title, as shown below.
-
-
Step 6: Another Feature, Search
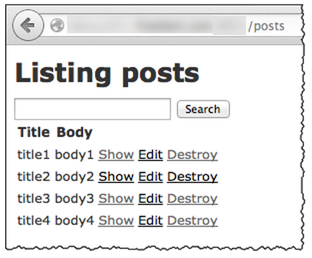
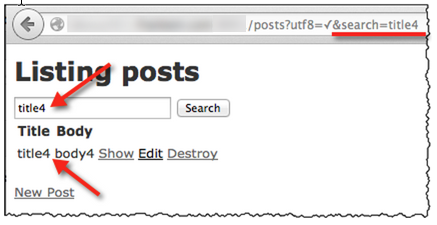
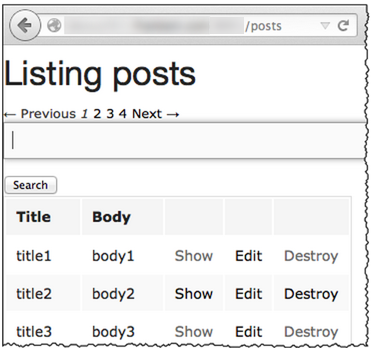
Next let's add search capabilities to the application with a text field and Search button, as shown below.
-
-
-
-
To do this we first need to open file app/views/posts/index.html.erb for editing and paste in the below code. This file is displayed when you point your browser at path /posts.
-
-
---app/views/posts/index.html.erb---
<h1>Listing posts</h1>
<%= form_tag posts_path, method: :get do %>
<%= text_field_tag :search, params[:search] %>
<%= submit_tag "Search", :name => nil %>
<% end %>
<table>
<thead>
<tr>
<th>Title</th>
. . .
-
-
The form_tag Rails method will generate the form we see in the above screenshot. Note that parentheses on method calls, like form_tag and posts_path, are optional. The other way to write that line would be as follows:
-
-
form_tag(posts_path(), method: :get) do
-
-
The <% and %> characters allow you to insert Ruby code into an HTML document. Before the HTML document is sent to the browser, that code will be invoked. In some cases you will see <%= and that means whatever is returned from that bit of code should be placed into the HTML.
-
The posts_path is a method that was automatically made available when your application started and is based on what is defined in the config/routes.rb file, as shown below.
-
-
---config/routes.rb---
App1e1::Application.routes.draw do
resources :posts
end
-
-
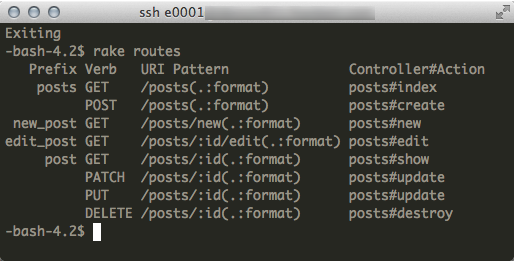
To learn more about what resources :posts accomplishes you need to run the rake routes command, as shown below.
-
-
-
-
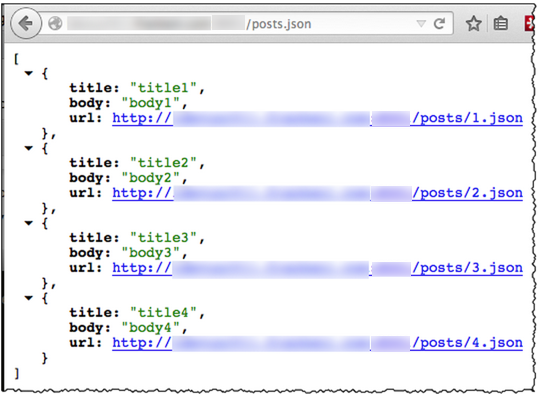
When your Rails application starts it looks at the routes.rb file to learn how to map an inbound request from the browser to the various controllers. For example, the first entry above states that an HTTP GET request of /posts will invoke Controller#Action posts#index - specifically, the index method in the posts_controller.rb file. The (.:format) in the URI Pattern column is telling us we can alternatively ask for a different format to be returned other than the default of HTML. For example, if we put .json at the end of the URL we receive back JSON, as shown below. This is very handy for doing web services!
-
-
-
-
Now let's continue with our search feature. Next we need to modify app/controllers/posts_controller.rb to implement new search capabilities as shown below.
-
-
---app/controllers/posts_controller.rb---
class PostsController < ApplicationController
before_action :set_post, only: [:show, :edit, :update, :destroy]
def index
#@posts = Post.all
@posts = Post.search(params[:search])
end
-
-
As you can see the original call to Post.all has been commented out and there is a new search method on the Post model object. The search method needs to be added to the app/models/post.rb file, as shown below and receive in a single string being passed from posts_controller.rb via the params[] array which is how Rails retrieves values from the inbound HTTP request.
-
-
---app/models/post.rb---
class Post < ActiveRecord::Base
validates_presence_of :title
def self.search(search)
if search
where('title LIKE ?', "%#{search}%")
else
all
end
end
end
-
-
Now that you have modified the post's view, controller, and model you can restart your Rails server and try it out, as shown below.
-
-
Step 7: Another Feature, Comments on a Post
What is a blog without the ability add comments to hear what others think?! Let's create a new feature so comments can be added to posts. When we started this project we created full scaffolding (CRUD) for the POSTS DB2 table, but in this case we don't want that and instead we will only allow the addition of comments from the post's "show" page (i.e. app/views/posts/show.html.erb). The beauty of Rails' generators is they can be used in granular fashion. Below we will generate a new model named comment and give it two columns - commenter and body. At the very end we also see post:references. This is telling the Rails generator to associate comments to posts and that in turn will create the foreign key relationship from the COMMENTS table to the POSTS table (i.e. table COMMENTS will have foreign key column POST_ID that will point at table POSTS id column). This is a huge time saver!
-
-
$ rails generate model comment commenter:string body:string post:references
-
-

-
-
Database migration script db/migrate/20140613205536_create_comments.rb was generated, as shown below. The syntax you see is a Ruby database DSL (Domain Specific Language) - a simple syntax created to specifically aid in maintaining databases. Here we see the create_table method being passed a single parameter of :comments. Note that :comments is a Ruby symbol which could also be written as 'comments'. The do and end are defining a Ruby block** which is passed into the method for subsequent execution.
-
-
---db/migrate/20140613205536_create_comments.rb---
class CreateComments < ActiveRecord::Migration
def change
create_table :comments do |t|
t.string :commenter
t.string :body
t.references :post, index: true
t.timestamps
end
end
end
-
-
**Ruby blocks are a new concept to most programmers. For that reason, here are a handful of tutorials that will aid in learning about them outside of this lab:
- CodeAcademy.com goes through a tutorial
- Robert goes through blocks, procs and lambdas
- Cartoon Foxes approach (search for "Blocks" on the page)
-
-
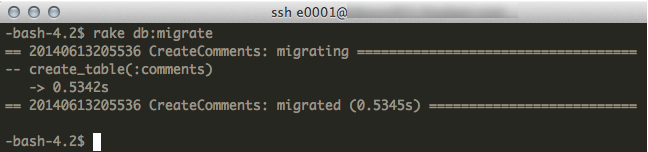
At this point a database migration script exists and we now need to run rake db:migrate to create the table in the DB2 database, as shown below.
-
-
$ rake db:migrate
-
-
-
-
The rails generate model comment… comand also created the apps/models/comment.rb file, as shown below. The belongs_to :post syntax is declaring a relationship from the comment.rb to post.rb making traversing the database very simple.
-
-
---app/models/comment.rb---
class Comment < ActiveRecord::Base
belongs_to :post
end
-
-
To best show this traversing we first need to add a new line to the apps/models/post.rb file, as shown below. The has_many :comments is declaring the relationship from the POSTS table to the COMMENTS table.
-
-
---app/models/post.rb---
class Post < ActiveRecord::Base
has_many :comments
validates_presence_of :title
def self.search(search)
if search
find(:all, :conditions => ['title LIKE ?', "%#{search}%"])
else
find(:all)
end
end
end
-
-
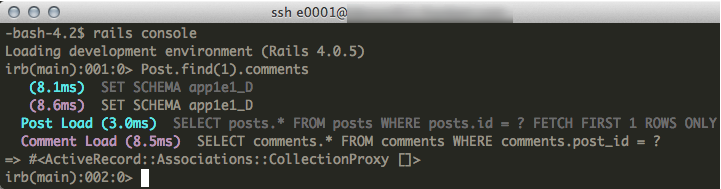
Open the rails console and issue the Post.find(1).comments command, as shown below. See how simple it was to traverse from one model object to another? The equivalent in RPG would have taken a number of more lines (i.e. setll, reade, dow, etc). Because of this capability I've started to use the Rails console for viewing database data instead of tools like STRSQL or SquirrelSQL.
-
-
-
-
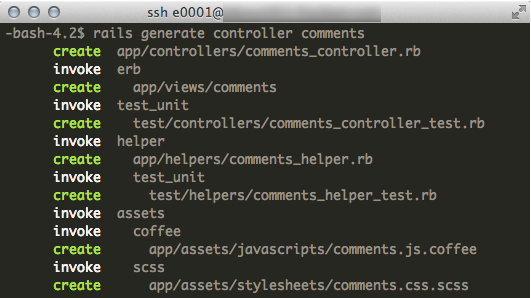
Now that the comment model is created we need to add the controller to receive in HTTP requests and add comments, as shown below.
-
-
$ rails generate controller comments
-
-
-
-
The primary generated file we are interested in is app/controllers/comments_controller.rb, shown below with code you need to paste into your project. At a high level the create method will receive in an HTTP request, find the post, and then create a new row in the COMMENTS table.
-
-
---app/controllers/comments_controller.rb---
class CommentsController < ApplicationController
def create
@post = Post.find(params[:post_id])
@comment = @post.comments.create(params[:comment].permit(:commenter, :body))
redirect_to post_path(@post)
end
end
-
-
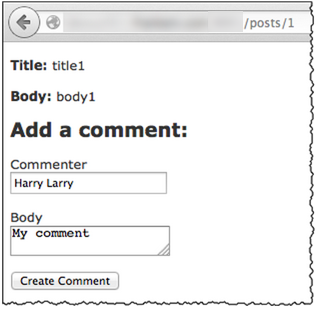
Next we need to modify the page that displays a single post to have an HTML form for comments, as shown below.
-
-
---apps/views/posts/show.html.erb---
<p id="notice"><%= notice %></p>
<p>
<strong>Title:</strong>
<%= @post.title %>
</p>
<p>
<strong>Body:</strong>
<%= @post.body %>
</p>
<h2>Add a comment:</h2>
<%= form_for([@post, @post.comments.build]) do |f| %>
<p>
<%= f.label :commenter %><br />
<%= f.text_field :commenter %>
</p>
<p>
<%= f.label :body %><br />
<%= f.text_area :body %>
</p>
<p>
<%= f.submit %>
</p>
<% end %>
<%= link_to 'Edit', edit_post_path(@post) %> |
<%= link_to 'Back', posts_path %>
-
-
The form_for method is much more powerful than form_tag because it operates on the "convention over configuration" concept. What does that mean? Well, the form_for accepts one or more ActiveRecord model objects and will generate the following HTML (non-essentials were grayed out).
-
-
Generated HTML You'll See In Browser (nothing for you to type in)
<form id="new_comment" class="new_comment" method="post" action="/posts/4/comments">
<input id="comment_commenter" type="text" name="comment[commenter]">
<textarea id="comment_body" name="comment[body]"></textarea>
<input type="submit" value="Create Comment" name="commit">
</form>
-
-
By passing in the @post object we obtained the action value of "/posts/4/comments" because Rails asked the @post object for its database id column value (4 in this case) and automagically knew what route to put in place.
-
Looking back at show.html.erb, the Ruby block (everything between the do and end) is passed the parameter of f. The f is an instance of the "comment" form and is used to reference the database columns so you can specify where they should appear in the generated HTML. Looking back at the generated HTML we can see comment[commenter] and comment[body] were generated for us. This becomes significant when we look back to the comments_controller.rb code we added earlier - specifically this: params[:comment]. By passing :comment to the params[] array we were able to tell Rails to bring in everything relating to the comment form all at once. This is in contrast to having separate calls for each form field which can make for significantly busier code when dealing with a form that has many input fields. Rails saving us time again!
-
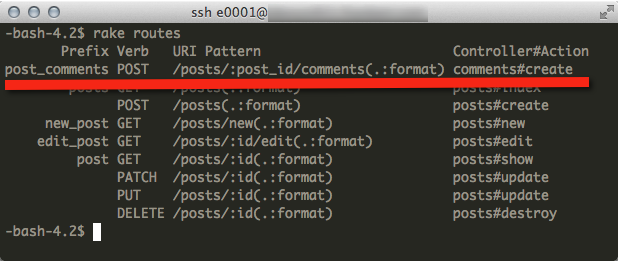
The last change we need to make is to file config/routes.rb, as shown below (additions are colored). Let's explain this addition. Going back to our generated HTML we had the <form> tag with an action="/posts/4/comments". When this URL is issued through the browser we need to tell the Rails framework how to route it to the comments_controller.rb's create method. We do this by adding resources :comments. The context of this application declares that comments are always a child of a post and that is why it is declared within the resources :posts declaration with a Ruby block. Lastly, we specify only: [:create] as the only path we want to route for the comments_controller.rb (because it is the only method that really exists).
-
NOTE: After making any change to routes.rb you will need to restart your webserver.
-
-
---config/routes.rb---
App1e1::Application.routes.draw do
resources :posts do
resources :comments, only: [:create]
end
end
-
-
After modifying routes.rb you can run rake routes to see how that altered the route listing.
-
-
-
-
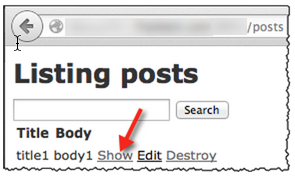
Now is the time to start up the Rails web server again (rails s -p<port>) and attempt to add a comment to an existing post.
-
First go to the posts listing page and select the Show link.
-
-
-
-
Add a comment.
-
-
-
-
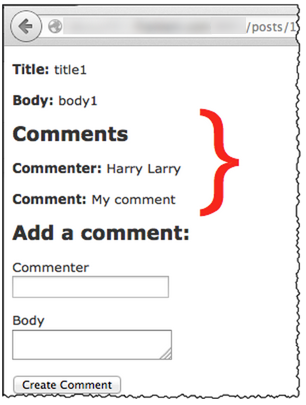
Notice how the comment you added wasn't displayed back to the screen? We need to display existing comments by adding the following code to app/views/posts/show.html.erb. The colored code is what is being added. The @post object was already being made available from app/controllers/posts_controller.rb's show method, so then we are able to use "method chaining" to access its other database relationships - in this case iterate over the comments.
-
-
---app/views/posts/show.html.erb---
<p id="notice"><%= notice %></p>
<p>
<strong>Title:</strong>
<%= @post.title %>
</p>
<p>
<strong>Body:</strong>
<%= @post.body %>
</p>
<h2>Comments</h2>
<% @post.comments.each do | comment | %>
<p>
<strong>Commenter:</strong>
<%= comment.commenter %>
</p>
<p>
<strong>Comment:</strong>
<%= comment.body %>
</p>
<% end %>
<h2>Add a comment:</h2>
<%= form_for([@post, @post.comments.build]) do |f| %>
<p>
<%= f.label :commenter %><br />
. . .
-
-
You can now see the existing comments, as shown below.
-
-
-
-
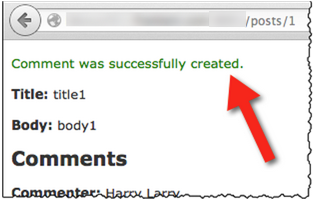
Another nice feature we could add is a confirmation message stating the comment was successfully added, as shown below.
-
-
-
-
Rails' confirmation messages (aka flash messages) are very easy to implement by adding a second parameter of notice: 'Comment was successfully created.' to the redirect_to method, as shown below.
-
-
---app/controllers/comments_controller.rb---
class CommentsController < ApplicationController
def create
@post = Post.find(params[:post_id])
@comment = @post.comments.create(params[:comment].permit(:commenter, :body))
redirect_to post_path(@post), notice: 'Comment was successfully created.'
end
end
Step 8: Another Feature, Adding Paging By Adding A Gem
At this point the application is functional, but there is something that will eventually go wrong with the index page because it shows all posts - when there are many hundreds of posts they will all be displayed to the user. This means we should add paging capabilities to the application. The Rails framework has paging built-in, but there is another more popular paging mechanism named will_paginate that we will install to use within our application.
-
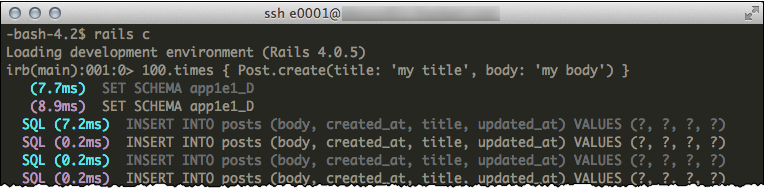
Tip: To quickly populate the table with many rows of test data (to trigger the need for paging) you can run the following command from the rails console, as shown below.
-
-
irb> 100.times { Post.create(title: 'my title', body: 'my body') }
-
-
-
-
The important thing to realize in this portion of the exercise is how simple it is to obtain, install, and use a gem developed by a third party. This is one of the reasons the Ruby language and Rails web framework have been so successful - they know how to streamline processes and development.
-
Briefly: What is a gem(aka RubyGems)? RubyGems is a package manager for the Ruby programming language that provides a standard format for distributing Ruby programs and libraries (in a self-contained format called a "gem"), a tool designed to easily manage the installation of gems, and a server for distributing them.
-
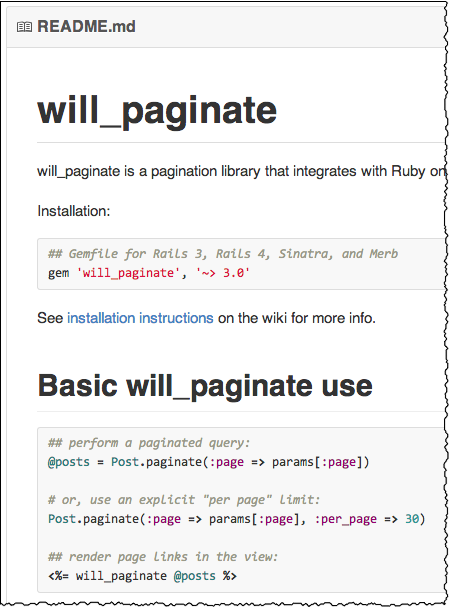
Whenever you pursue using a gem it is always good to visit its source repository page to review the README.md file on GitHub.com, as shown below.
-
NOTE: GitHub.com is the preferred hosting site for Ruby and Rails developers.
-
-
-
-
The first step of using this gem is to open the app1e1/Gemfile and add line gem 'will_paginate', '~> 3.0', as shown below.
-
-
---Gemfile---
source 'https://rubygems.org'
gem 'rails'
gem 'sass-rails'
gem 'ibm_db'
gem 'uglifier'
gem 'coffee-rails'
gem 'jquery-rails'
gem 'turbolinks'
gem 'jbuilder'
gem 'tzinfo-data'
gem 'puma'
gem 'will_paginate', '~> 3.0'
-
-
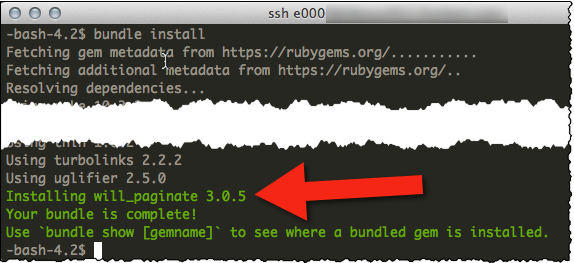
The Gemfile file documents the gem dependencies an application has. Once you have altered the Gemfile contents it is necessary to run the bundle install command, as shown below. Again, make sure you are in the application's root folder before running any commands.
-
-
$ bundle install
-
-
-
-
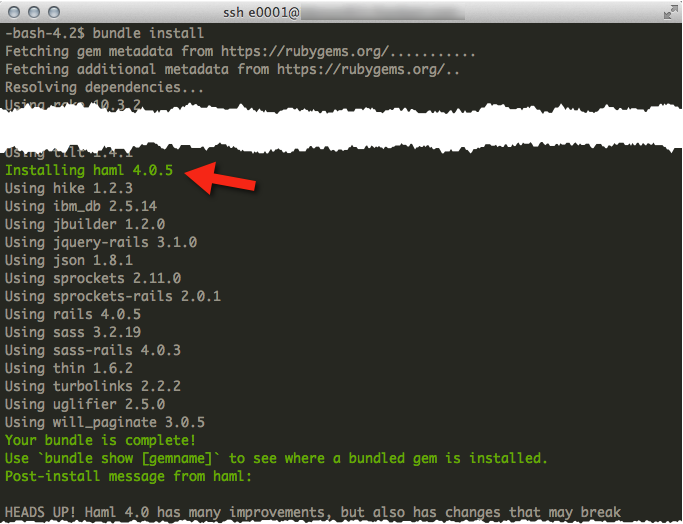
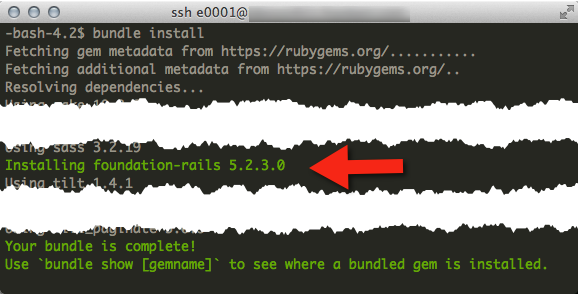
What just happened? There is a tool named Bundler (where the bundle install command comes from) that is used to review all the gems specified in the Gemfile file and compare them to the Gemfile.lock file. If a new dependency has been introduced it will make a request to rubygems.org and download/install the gem to your machine (in this case the IBM i). As bundler it goes through the various gems it will output logs to the terminal stating "Using …" or "Installing …" at the beginning of each line. "Using…" means it found the gem locally and will use it. "Installing…" means it downloaded the gem and installed it.
-
The next default implementation step for will_paginate from the screenshot above is to alter the app/controllers/posts.controller.rb file, but we can't do the default implementation because we added search capabilities earlier and we need to have the search method in app/models/post.rb work with this new Post.paginate method. The good thing is that the will_paginate author gives an example on how to get around this by modifying the model object (in our case, post.rb).
-
Note the addition of the page parameter on the search method.
-
-
---app/models/post.rb---
class Post < ActiveRecord::Base
has_many :comments
validates_presence_of :title
def self.search(search, page)
if search
paginate page: page, :conditions => ['title LIKE ?', "%#{search}%"]
else
paginate page: page
end
end
end
-
-
NOTE: The two lines in color above might look odd - especially if I told you they are method calls. Parentheses on method calls and definitions are optional in Ruby. The equivalent with parentheses would be paginate(page: page). Why would you want to eliminate parentheses? I didn't, at first. But then I realized how much less busy my code became when I omitted parentheses in certain cases.
-
As you can see we added a new parameter to the search method so that means we need to change all programs that make calls to that method. In this case only app/controllers/posts_controller.rb needs to change, as shown below.
-
-
---app/controllers/posts_controller.rb---
class PostsController < ApplicationController
before_action :set_post, only: [:show, :edit, :update, :destroy]
def index
#@posts = Post.all
@posts = Post.search(params[:search], params[:page])
end
-
-
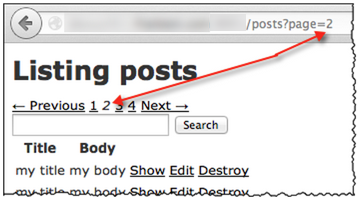
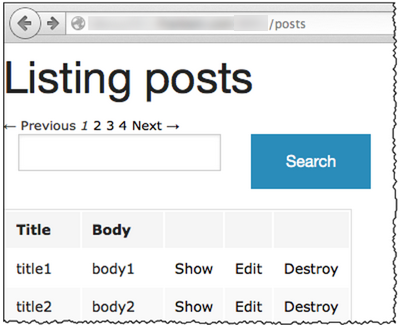
The last step is to modify the view layer, in this case the app/views/posts/index.html.erb file, as shown below.
-
-
---app/views/posts/index.html.erb---
<h1>Listing posts</h1>
<%= will_paginate @posts %>
<%= form_tag posts_path, method: :get do %>
<%= text_field_tag :search, params[:search] %>
<%= submit_tag "Search", :name => nil %>
<% end %>
<table>
<thead>
. . .
-
-
If you haven't already, it is important to stop and restart the Rails web server. Why? Because the will_paginate gem initializes itself at application startup and uses the Ruby open class concept to dynamically inject new methods (i.e. paginate) into the model objects in app/models. This is VERY cool because it affords some very nice integration points by Ruby developers while keeping syntax fairly simple.
-
-
Step 9: HAML - Cleaning Up The View Syntax
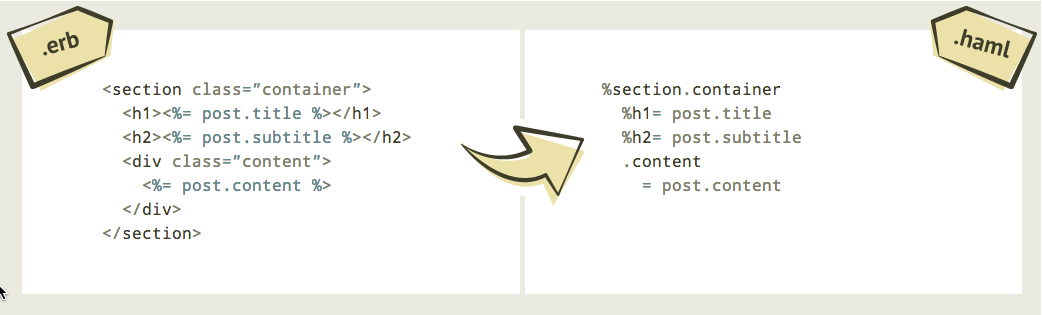
In the spirit of making things better, the Rails community has developed an alternative to the very verbose HTML and ERB syntax named HAML. What does this better syntax look like? Here's a screenshot from their documentation:
-
-
-
-
I'd say that lessened the amount of code by nearly 50%! Not only does this mean less typing but also allows you to visually grasp what the code is accomplishing more quickly - a double whammy time saver!
-
To make use of HAML we first need to install it. And yes, you guessed it, HAML is available as a Ruby gem. See below for how the Gemfile file needs to change.
-
-
---Gemfile---
source 'https://rubygems.org'
gem 'rails'
gem 'sass-rails'
gem 'ibm_db'
gem 'uglifier'
gem 'coffee-rails'
gem 'jquery-rails'
gem 'turbolinks'
gem 'jbuilder'
gem 'tzinfo-data'
gem 'puma'
gem 'will_paginate', '~> 3.0'
gem 'haml', '~> 4.0.5'
-
-
Next run the bundle install command, as shown below.
-
-
$ bundle install
-
-
-
-
Now we need a candidate file to convert from HTML to HAML and app/views/posts/index.html.erb is a good pick. First, the file should be renamed to index.html.haml. This is necessary so the HAML Gem knows to process it.
-
We could manually convert the HTML and ERB to HAML but there are a number of browser apps that will convert it for you. I used this one to produce the following HAML conversion.
-
-
---app/views/posts/index.html.haml---
%h1 Listing posts
= will_paginate @posts
= form_tag posts_path, method: :get do
= text_field_tag :search, params[:search]
= submit_tag "Search", :name => nil
%table
%thead
%tr
%th Title
%th Body
%th
%th
%th
%tbody
- @posts.each do |post|
%tr
%td= post.title
%td= post.body
%td= link_to 'Show', post
%td= link_to 'Edit', edit_post_path(post)
%td= link_to 'Destroy', post, method: :delete, data: { confirm: 'Are you sure?' }
%br/
= link_to 'New Post', new_post_path
-
-
Start your Rails web application with rails s -p<port> and go to URL http://<machine>:<port>/posts to see if it worked (it worked if the page displays at all, the actual content didn't change).
-
New HAML syntax aside, I do think this is a lot simpler to gain an understanding of what the page is doing. HAML is very popular in the Rails community so it is well worth it to use it, though definitely not required.
-
For adding learning you should try converting app/views/posts/show.html.erb to be HAML.
-
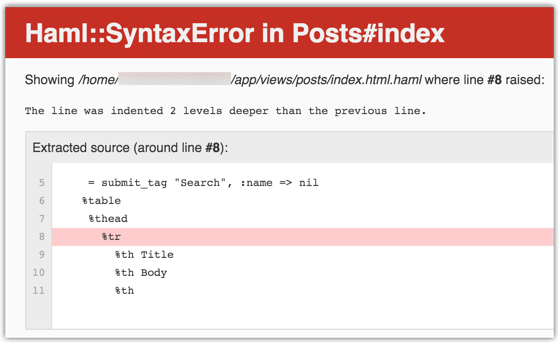
Sometimes copy and paste don't work so well for Haml syntax because leading blanks are very important to the structure. For example, if you received a message like the following then you need to make sure each of your indentations is 2 spaces.
-
-
Step 10: Easier On The Eyes
You may have noticed the visual presentation of the page isn't very aesthetically pleasing. While I highly recommend getting a visual designer involved for customer facing websites, there is something we can do to make it look much more professional without a lot of work.
-
You will find the mechanisms to pretty up the user interface to be many, but the one we are going to pursue today is called Foundation from Zurb. Foundation is great because it lives in the reality that most sites will be visited by both mobile devices and desktop, and can respond accordingly (aka responsive design).
-
-

-
-
To install Foundation we need to add the below entry to our Gemfile.
-
-
---Gemfile---
. . .
gem 'will_paginate', '~> 3.0'
gem 'haml', '~> 4.0.5'
gem 'foundation-rails', '5.2.3.0'
-
-
Next run bundle install, as shown below.
-
-
$ bundle install
-
-
-
-
The next step is to run the following:
-
-
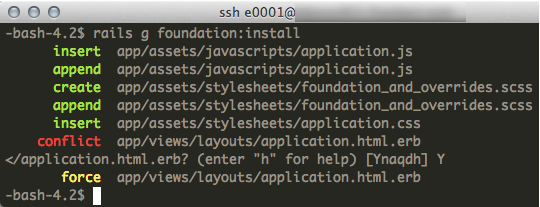
$ rails g foundation:install
-
-
This will create the files shown below and will also prompt you to say the app/views/layouts/application.html.erb file already exists and whether it should overwrite it. In our case it is fine to overwrite it, but if this was an app that had been around for awhile you'd want to make sure you weren't wiping out changes.
-
-
-
-
One cool thing you should note about that last step is that the Foundation Gem includes its own custom code generator. The ability to create your own generators is actually part of the Rails web framework. The Rails authors recognized that people would want to generate code or change existing Rails generators according to how their shop operates. Again, another big time saver.
-
At this point it's time to start your Rails web server again.
-
Without touching a line of code we can see our application is already looking better. Notice the table rows are better separated with alternating colors.
-
-
-
-
There are two obvious issues still. First, the search input box is way too long, and second, the search button is unimpressive. To remedy the size and placement of the input box and search button we will make use of Zurb's grids, as shown below. To remedy the unimpressive search button we will add button and inline as stylesheet classes, also shown below. These settings were found by visiting the Foundation documentation.
-
NOTE: HAML makes assumptions for when to generate a closing tag based on indentation. This means child elements must always be indented the same amount (i.e. two spaces) or else HAML will issue an error.
-
-
---app/views/posts/index.html.haml---
%h1 Listing posts
= will_paginate @posts
= form_tag posts_path, method: :get do
.row
.small-3.columns
= text_field_tag :search, params[:search]
.small-9.columns
= submit_tag "Search", :name => nil, class: "button inline"
. . .
-
-
Now refreshing the page we see the following. Nice!
-
-
-
-
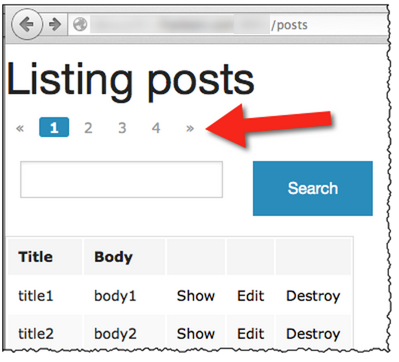
At this point it is obvious the paging controls are ugly and hard to click because they are so small, but how do we fix that since the will_paginate gem has all that HTML generation built into it? Well, Google is your friend. A search for "zurb will_paginate" surfaced the foundation-will_paginate gem.
-
The README.md tells us to add foundation-will_paginate to our Gemfile and run bundle install, as shown below.
-
-
---Gemfile---
source 'https://rubygems.org'
. . .
gem 'will_paginate', '~> 3.0'
gem 'haml', '~> 4.0.5'
gem 'foundation-rails', '5.2.3.0'
gem 'foundation-will_paginate', '~> 0.0.1'
-
-

-
-
---app/views/posts/index.html.haml---
%h1 Listing posts
= foundation_paginate @posts
= form_tag posts_path, method: :get do
.row
.small-3.columns
. . .
-
-
Start your Rails web server and point your browser at the /posts page, as shown below.
-
Wow! That looks a lot better! Look how much was accomplished with very little effort - that's the Rails communities way.
-
-
-
-
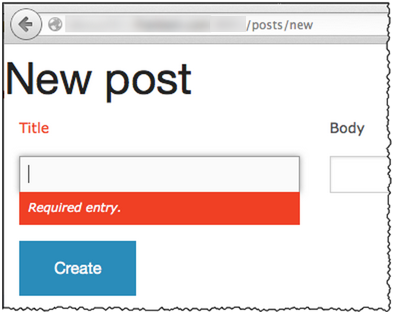
There's one last "eye candy" change we will make. Zurb has client-side form validation that can save a trip to the web server. The one area we've added validation is in post.rb to make sure title is present so let's modify _form.html.erb to display an error if the field is empty, as shown below.
-
Digression: Why does the file start with an underscore? Because it is a "partial" file and that is the convention Rails uses to name partials. A partial is a mechanism to store chunks of code in separate files for re-use. In this case both app/views/posts/new.html.erb and app/views/posts/edit.html.erb make use of the _form.html.erb partial using the syntax <%= render 'form' %>. That seems like a paltry amount of code to declare the path, doesn't it? That's Rails' "Convention over Configuration" coming into play again. It will first look in folder app/views/posts for a file named _form.html.erb and if not found it will next look in the generic app/views/layouts location. Slick!
-
The Zurb documentation says we need to add the data-abide attribute to the form tag and below we see the Rails way of doing that. Next we will add a HTML5 attribute of required: '' to the title and also add the <small> HTML tag immediately below it. How did I know to do this? The Zurb documentation told me so :-) I call this the "test and see" method of implementing features and then usually dig in to find out more.
-
-
---app/views/posts/_form.html.erb---
<%= form_for(@post, data: {abide: ''}) do |f| %>
<% if @post.errors.any? %>
<div id="error_explanation">
<h2><%= pluralize(@post.errors.count, "error") %> prohibited this post from being saved:</h2>
<ul>
<% @post.errors.full_messages.each do |msg| %>
<li><%= msg %></li>
<% end %>
</ul>
</div>
<% end %>
<div class="small-4 columns">
<%= f.label :title %><br>
<%= f.text_field :title, required: '' %>
<small class="error">Required entry.</small>
</div>
<div class="small-4 columns">
<%= f.label :body %><br>
<%= f.text_field :body %>
</div>
<div class="columns">
<%= f.submit 'Create', class: "button" %>
</div>
<% end %>
-
-
Now go back to your browser and attempt to add a new post without a title. Wow! That looks very nice! Notice the field also has a shadow around it for added touch.
-
-
-
-
You've most likely noticed the lack of any additional Javascript. It is generally very frowned upon to introduce Javascript into the UI templates and instead all Javascript should be stored in separate files.
-
-
That concludes this tutorial!
You made it to the end! If this is your first time using Rails I hope you can now see how it can save a lot of time but also how much fun it is to code because many things can be accomplished in short order.